This blog post is written by CDT Student Alex Davies
Sometimes your data has a lot of features. In fact, if you have more than three, useful visualisation and understanding can be difficult. In a machine-learning context high numbers of features can also lead to the curse of dimensionality and the potential for overfitting. Enter this family of algorithms: dimensionality reduction.
The essential aim of a dimensionality reduction algorithm is to reduce the number of features of your input data. Formally, this is a mapping from a high dimensional space to low dimensional. This could be to make your data more concise and robust, for more efficient applications in msachine-learning, or just to visualise how the data “looks”.
There are a few broad classes of algorithm, with many individual variations inside each of these branches. This means that getting to grips with how they work, and when to use which algorithm, can be difficult. This issue can be compounded when each algorithm’s documentation focuses more on “real” data examples, which is hard for humans to really grasp, so we end up in a situation where we are using a tool we don’t fully understand to interpret data that we also don’t understand.
The aim of this article is to give you some intuition into how different classes of algorithm work. There will be some maths, but nothing too daunting. If you feel like being really smart, each algorithm will have a link to a source that gives a fully fleshed out explanation.
How do we use these algorithms?
This article isn’t going to be a tutorial in how to code with these algorithms, because in general its quite easy to get started. Check the following code:
import numpy as np
import matplotlib.pyplot as plt
from sklearn.datasets import load_digits
from sklearn.manifold import TSNE

#    Load the data, here we're using the MNIST dataset
digits     = load_digits()

#    Load labels + the data (here, 16x16 images)
labels     = digits["target"]
data       = digits["data"]

#    Initialise a dimensionality model - this could be sklearn.decomposition.PCA or some other model
TSNE_model = TSNE(verbose = 0)
#    Apply the model to the data
embedding  = TSNE_model.fit_transform(data)

#    Plot the result!
fig, ax = plt.subplots(figsize = (6,6))
for l in np.unique(labels):
    ax.scatter(*embedding[labels == l,:].transpose(), label = l)
ax.legend(shadow = True)
plt.show()

/Users/alexdavies/miniforge3/envs/networks/lib/python3.9/site-packages/sklearn/manifold/_t_sne.py:780: FutureWarning: The default initialization in TSNE will change from 'random' to 'pca' in 1.2.
  warnings.warn(

/Users/alexdavies/miniforge3/envs/networks/lib/python3.9/site-packages/sklearn/manifold/_t_sne.py:790: FutureWarning: The default learning rate in TSNE will change from 200.0 to 'auto' in 1.2.
  warnings.warn(
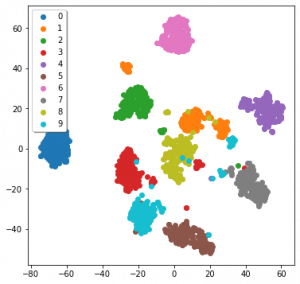
The data we’re using is MNIST, a dataset of 16×16 monochrome hand-written digits from one to ten. I’ll detail how TSNE works later on. Admittedly this code is not the tidiest, but a lot of it is also just for a nice graph at the end. The only lines we dedicated to TSNE were the initial import, calling the model, and using it to embed the data.
We still have the issue, though, of actually understanding the data. Here its not too bad, as these are images, but in other data forms we can’t really get to grips with how the data works. Ideally we’d have some examples of how different algorithms function when applied to data we can understand…
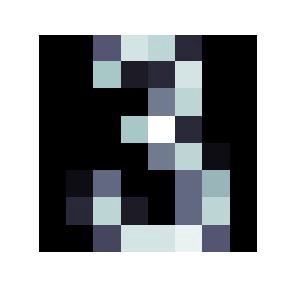
An image from the MNIST dataset, here of the number 3
Toy examples
Here are some examples of how different algorithms function apply to data we can understand. I’d credit this sklearn page on clustering as inspiration for this figure.
Toy 3D data, and projections of it by differerent algorithms. All algorithms are run with their default parameters.
The examples down the first column are the original data in 3D. The other columns are how a given algorithm projects these examples down into scatter-plot-able 2D. Each algorithm is run with its default parameters, and these examples have in part been designed to “break” each algorithm.
We can see that PCA (Principle Component Analysis) and TruncatedSVD (the sklearn version of Singular Value Decomposition) function like a change in camera angle. MDS (Multi-Dimensional Scaling) is a little more odd, and warps the data a little. Spectral Embedding has done a similar thing to MDS.
Things get a little weirder when we get onto TSNE (T-Stochastic Neighbours Embedding) and UMAP (Uniform Manifold Approximation and Projection). The data doesn’t end up looking much like the original (visually), but they have represented something about the nature of the data, often separating the data where appropriate.
PCA, SVD, similar
This is our first branch of the dimensionality reduction family tree, and are often the first dimensionality reduction methods people are introduced to, in particular PCA. Assuming we’re in a space defined by basis vectors V, we might want to find the most useful (orthogonal) combination of these basis vectors U, as in uᵢ = α v₁ + β v₂+ …
V here can be thought of our initial angle to the axes of the data, and U a “better” angle to understand the data. This would be called a “linear transform”, which only means that a straight line in the original data will also be a straight line in the projection.
Linear algebra-based methods like SVD and PCA try and use a mathematical approach to find the optimum form of U for a set of data. PCA and SVD aim to find the angle that best explain the covariance of the data. There’s a lot of literature out there about these algorithms, and this isn’t really the place for mathematic discussion, but I will give some key takeaways.
A full article about PCA by Tony Yiu can be found here, and here’s the same for SVD by Hussein Abdulrahman.
Firstly, these algorithms don’t “change” the data, as shown in the previous section. All they can do is “change the angle” to one that hopefully explains as much as possible about the data. Secondly, they are defined by a set of equations, and there’s no internal optimisation process beyond this, so you don’t need to be particularly concerned about overfitting. Lastly, each actually produces the same number of components (dimensions) as your original data, but ordered by how much covariance that new component explains. Generally you’ll only need to use the first few of these components.
We can see this at play in that big figure above. All the results of these algorithms, with a little thought, are seen to explain the maximum amount of variance. Taking the corkscrews as an example, both algorithms take a top down view, ignoring the change along the z axis. This is because the maximum variance in the data is the circles that the two threads follow, so a top down view explains all of this variance.
For contrast, here’s PCA applied to the MNIST data:
PCA applied to the MNIST data
Embeddings (MDS, Spectral Embedding, TSNE, UMAP)
The other branch of this family of algorithms are quite different in their design and function to the linear algebra-based methods we’ve talked about so far. Those algorithms look for global metrics — such as covariance and variance — across your data. That means they can be seen as taking a “global view”. These algorithms don’t necessarily not take a global view, but they have a greater ability to represent local dynamics in your data.
We’ll start with an algorithm that bridges the gap between linear algebra methods and embedding methods: Spectral Embedding.
Spectral Embedding
Often in machine-learning we want to be able to separate groups within data. This could be the digits in the MNIST data we’ve seen so far, types of fish, types of flower, or some other classification problem. This also has applications in grouping-based regression problems.
The problem (sometimes) with the linear-algebra methods above is that sometimes the data just isn’t that easily separable by “moving the camera”. For example take a look at the sphere-in-sphere example in that big figure above: PCA and SVD do not separate the two spheres. At this point it can be more practical to instead consider the relationships between individual points.
Spectral Embedding does just this: it measures the distance between a given number of neighbours. What we’ve actually done here is make a graph (or network) that represents the relationships between points. A simple example of building a distance-graph is below.
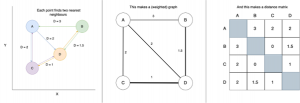
A very simple example of making a distance-graph and a distance-matrix
Our basic aim is to move to a 2D layout of the data that best represents this graph, which hopefully will show how the data “looks” in high dimensions.
From this graph we construct a matrix of weights for each connection. Don’t get too concerned if you’re not comfortable with the term “matrix”, as this is essentially just a table with equal numbers of rows and columns, with each entry representing the weight of the connection between two points.
In spectral embedding these distances are then turned into “weights”, often by passing through a normal distribution or simply binary edges. Binary edges would have [1 = is neighbour, 0 = is not neighbour]. From the weight matrix we apply some linear algebra. We’ll call the weight matrix W.
First we build a diagonal matrix (off diagonal = 0) by summing across rows or columns. This means that each point now has a given weight, instead of weights for pairs of points. We’ll call this diagonal weight matrix D.
We then get the “Laplacian”, L = D-W. The Laplacian is a difficult concept to summarise briefly, but essentially is a matrix that represents the weight graph we’ve been building up until now. Spectral Embedding then performs an “eigenvalue decomposition”. If you’re familiar with linear algebra this isn’t anything new. If you’re not I’m afraid there isn’t space to have a proper discussion of how this is done, but check this article about Spectral Embedding by Elemento for more information.
The eigenvalue decomposition produces a nice set of eigenvectors, one for each dimension in the original data, and like in PCA and SVD, we take the first couple as our dimensionality reduction. I’ve applied a Spectral Embedding to the MNIST data we’ve been using, which is in this figure:

Spectral Embedding applied to the MNIST digits dataset from sklearn
Interpreting spectral embeddings can be tricky compared to other algorithms. The important thing to bear in mind is that we’ve found the vectors that we think best describe the distances between points.
For a bit more analysis we can again refer to that big figure near the start. Firstly, to emphasise that we’re looking at distances, check out the cube-in-cube and corkscrews examples. The projections we’ve arrived at actually do explain the majority of the distances between points. The cubes are squashed together — because the distances between cubes is far less than the point-to-point diagonal distance. Similarly the greatest variation in distance in the corkscrew example is the circular — so that’s what’s preserved in our Spectral Embedding.
As a final observation have a look at what’s happened to our intersecting gaussians. There is a greater density of points at the centre of the distributions than at their intersection — so the Spectral Embedding has pulled apart them apart.
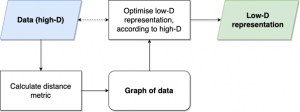
The basic process for (most) embedding methods, for example MDS, UMAP and t-SNE
UMAP, TSNE, MDS
What happens when we don’t solve the dimensionality reduction problem with any (well, some) linear algebra? We arrive at the last general group of algorithms we’ll talk about.
These start much the same as Spectral Embedding: by constructing a graph/network of the data. This is done in different ways by each of these algorithms.
Most simple is MDS, which uses just the distance between all points. This is a computationally costly step, as for N points, we have to calculate O(N²) distances.
TSNE does a similar thing as Spectral Embedding, and moves from distance into a weight of connection, which represents the probability that these two points are related. This is normally done using a normal distribution. Unlike Spectral Embedding or UMAP, TSNE doesn’t consider these distances for a given number of neighbours, but instead draws a bubble around itself and gets distances and weights for all the points in that bubble. It’s not quite that simple, but this is already a long article, so check this article by Kemal Erdem for a full walkthrough.
UMAP considers a fixed number of neighbours for each point, like Spectral Embedding, but has a slightly different way of calculating distances. The “Uniform Manifold” in UMAP means that UMAP is assuming that points are actually uniformly distributed, but that the data-space itself is warped, so that points don’t show this.
Again the maths here is difficult, so check the UMAP documentation for a full walkthrough. Be warned, however, that the authors are very thorough in their explanation. As of May 2022, the “how UMAP works” section is over 4500 words.
In UMAP, TSNE and Spectral Embedding, we have a parameter we can use to change how global a view we want the embedding to take. UMAP and Spectral Embedding are fairly intuitive, where we control simply the number neighbours considered, but in TSNE we use perplexity, which kind of like the size of the bubble around each point.
Once these algorithms have a graph with weighted edges, they try and lay out the graph in a lower number of dimensions (for our purposes this is 2D). They do this by trying to optimise according to a given function. This just means that they try and find the best way to place the nodes in our graph in 2D, according to an equation.
For MDS this is “stress”:

Credit goes to Saul Dobilas article on MDS
TSNE first calculated the student-t distribution with a single degree of freedom:
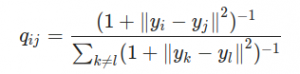
The student-t distribution with one degree of freedom, as used by TSNE
Its important to note in the equation above that all y are actually vectors, as in the stress equation, so that with those ||a— b|| partswe’re calculating a kind of distance. q here is the similarity between points. From here TSNE uses the Kullback-Leibler divergence of the two graphs to measure their similarity. It all gets very mathsy — check out Kemal Erdem’s article for more information.
UMAP again steps up the maths, and optimises the cross-entropy between the low-D and high-D layouts:

Cross-entropy used by UMAP. Subscript H indicates higher-D, subscript L indicates lower-D
The best explanation of UMAP actually comes from its own documentation. This might be because they don’t distribute it through sklearn.
This can be broken down into a repulsive and attractive “force” between points in the high-D and low-D graphs, so that the layout step acts like a set of atoms in a molecule. Using forces is quite common in graph layouts, and can be intuitive to think about compared to other metrics. It also means that UMAP (in theory) should be able to express both global and local dynamics in the data, depending on your choice of the number of neighbours considered. In practise this means that you can actually draw conclusions about your data from the distance between points across the whole UMAP embedding, including the shape of clusters, unlike TSNE.
It’s been a while without a figure, so here’s all three applied to the MNIST data:
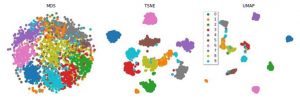
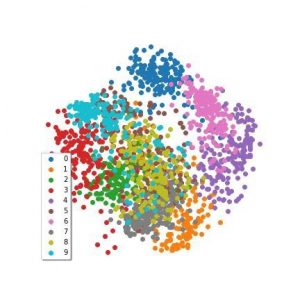
MDS, TSNE and UMAP applied to the sklearn version of the MNIST dataset
We can see that all three seem to have been fairly effective. But how should we understand the results of something that, while optimising the lower-D graph, uses a stochastic (semi-random) process? How do you interpret something that changes based on its random seed? Ideally, we develop an intuition as to how the algorithms function, instead of just knowing the steps of the algorithm.
I’m going to ask you to scroll back up to the top and take another look at the big figure again. Its the last time we do this, I promise.
Firstly, MDS considers all the inter-point relations, so the global shape of data is preserved. You can see this in particular in the first two examples. The inner cube has all of its vertices connected, and the vertices of each cube “line up” with each other (vague, hopefully you see what I mean). There is some disconnection in the edges of the outer cube, and some warping in all the other edges. This might be due to the algorithm trying to preserve distances, but as with all stochastic processes, its difficult to decipher.
UMAP and TSNE also maintain the “lines” of the cube. UMAP is actually successful at separating the two cubes, and makes interesting “exploded diagram” style representations of them. In the UMAP embedding only one of the vertices of each cube is separated. In the TSNE embedding the result isn’t as promising, possibly because the “bubble” drawn by the algorithm around points also catches the points in the other cube.
Both UMAP and TSNE separate the spheres in the second example and the gaussians in the fourth. The “bubble” vs neighbours difference between UMAP and TSNE is also illustrated by the corkscrews example (with a non-default number of neighbours considered by UMAP the result might be more similar). So these algorithms look great! Except there’s always a catch.
Check the final example, which we haven’t touched on before. This is just random noise along each axis. There should be no meaningful pattern in the projections — and the first four algorithms reflect this. SVD, MDS and the Spectral Embedding are actually able to represent the “cube” shape of the data. However, TSNE and UMAP could easily be interpreted as having some pattern or meaning, especially UMAP.
We’ve actually arrived at the classic machine-learning compromise: expressivity vs bias. As the algorithms become more complex, and more able to represent complex dynamics in the data, their propensity to also capture confounding or non-meaningful patterns also becomes greater. UMAP, arguably the most complex of these algorithms, arguably has the greatest expressivity, but also the greatest risk of bias.
Conclusions
So what have we learnt? As algorithms become more complex, they’re more able to express dynamics in the data, but risk also expressing patterns that we don’t want. That’s true all over machine learning, in classification, regression or something else.
Distance-based models with stochastic algorithms (UMAP, TSNE, MDS) represent the relationships between points, and linear-algebra methods (PCA, SVD) take a “global” view, so if you want to make sure that your reduction is true to the data, stick with these.
Parameter choice becomes more important in the newer, stochastic, distance-based models. The corkscrew and cube examples are useful here — a different choice of parameters and we might have had UMAP looking more like TSNE.